
A photocopier looks complicated, but making a good copy takes less than a minute once you know the basic steps. This guide shows you how to use a photocopier machine in an office, school or shop: where to put the original, which buttons to press, how to load paper and what to do when something goes wrong. The steps work on most machines, including Canon, Ricoh, Konica Minolta, Toshiba, Sharp and Kyocera. Button names can be slightly different on your model, but the idea is the same.
Main parts of a photocopier
Before you start, take a quick look at the machine. Knowing these parts makes every other step easier.
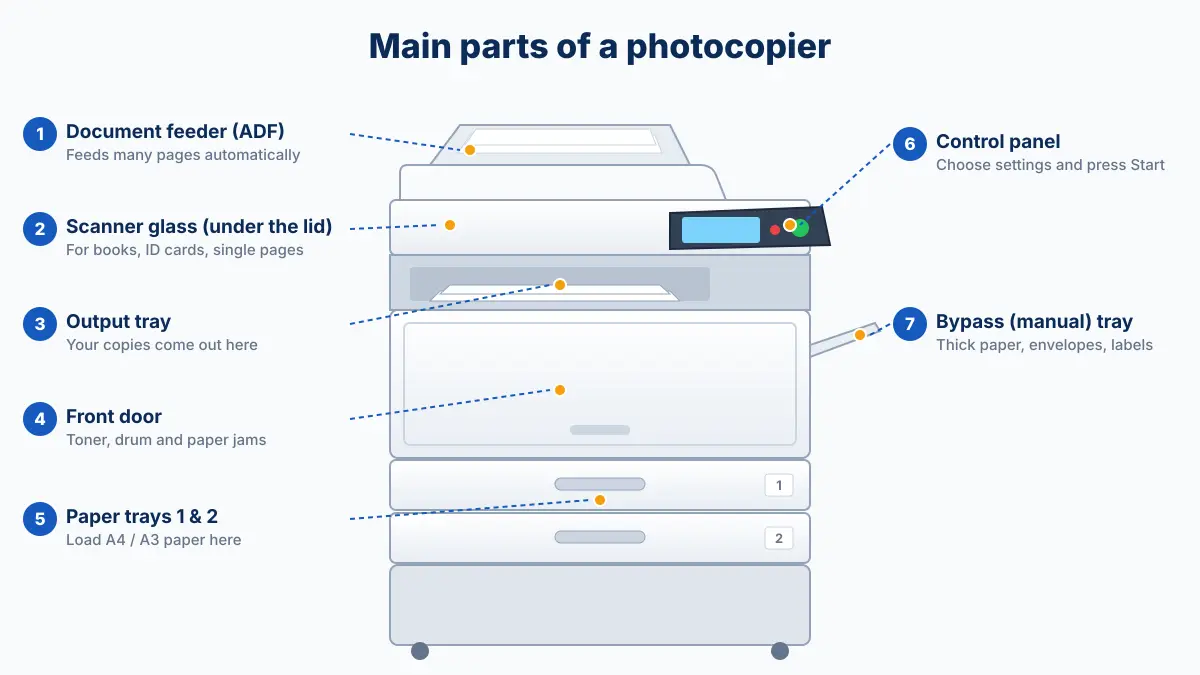
- Document feeder (ADF): the tray on top. It pulls in many loose pages one by one, so you don't have to copy them by hand.
- Scanner glass: the flat glass under the lid. Use it for books, ID cards and pages that are torn, folded or thick.
- Control panel: the screen and buttons where you choose the number of copies, paper size and other settings.
- Output tray: where the finished copies come out.
- Front door: opens to reach the toner, drum and any stuck paper.
- Paper trays: drawers at the bottom that hold A4 and A3 paper.
- Bypass (manual) tray: a small fold-out tray on the side for thick paper, envelopes, labels and one-off sizes.
How to make a copy: 5 simple steps
Step 1: Turn on the machine and wait
Press the power button and wait until the screen says Ready (or the Start button turns green). A cold machine needs a short time to warm up. If the machine is in sleep mode, just touch the screen or press any button to wake it.
Step 2: Place your original
You can put the original on the glass or in the document feeder. Choose the one that suits your document.
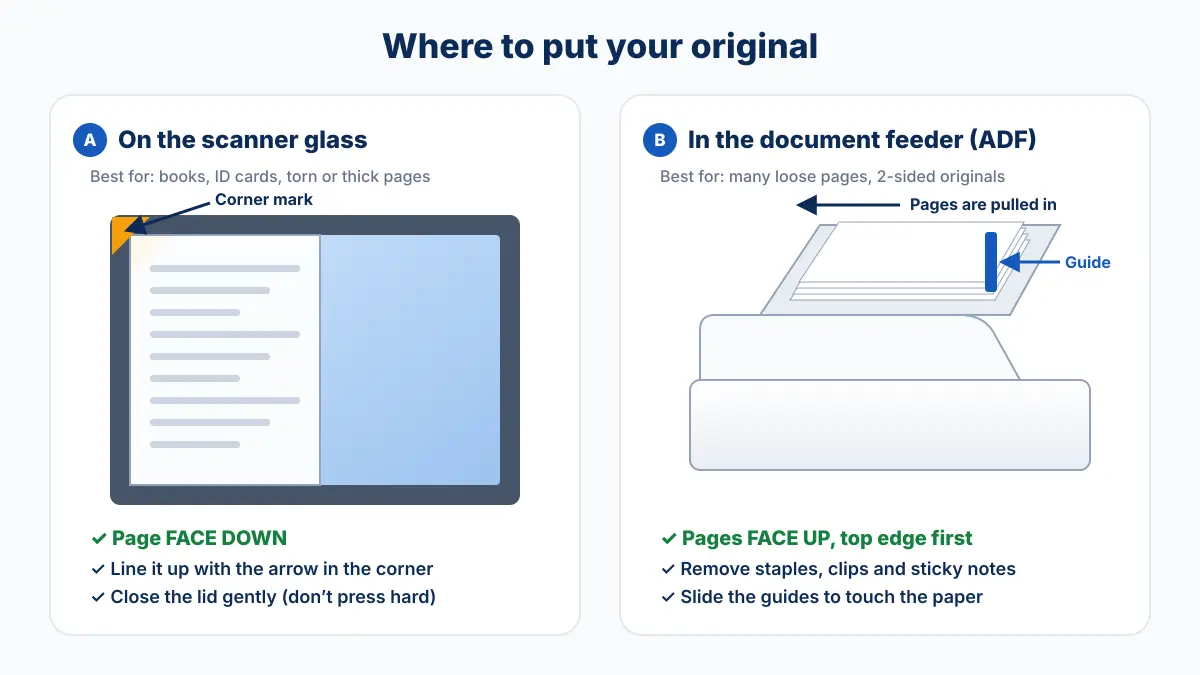
- On the glass: lift the lid and place the page face down. Line it up with the arrow mark in the corner of the glass, then close the lid gently. Use the glass for books, NID cards, passports, receipts and damaged pages.
- In the document feeder: place the pages face up with the top edge going in first, then slide the paper guides so they just touch the stack. Use the feeder for many loose pages.
Pro Tip: remove all staples, paper clips and sticky notes before using the feeder. A single staple can scratch the glass or jam the feeder.
Step 3: Choose your settings
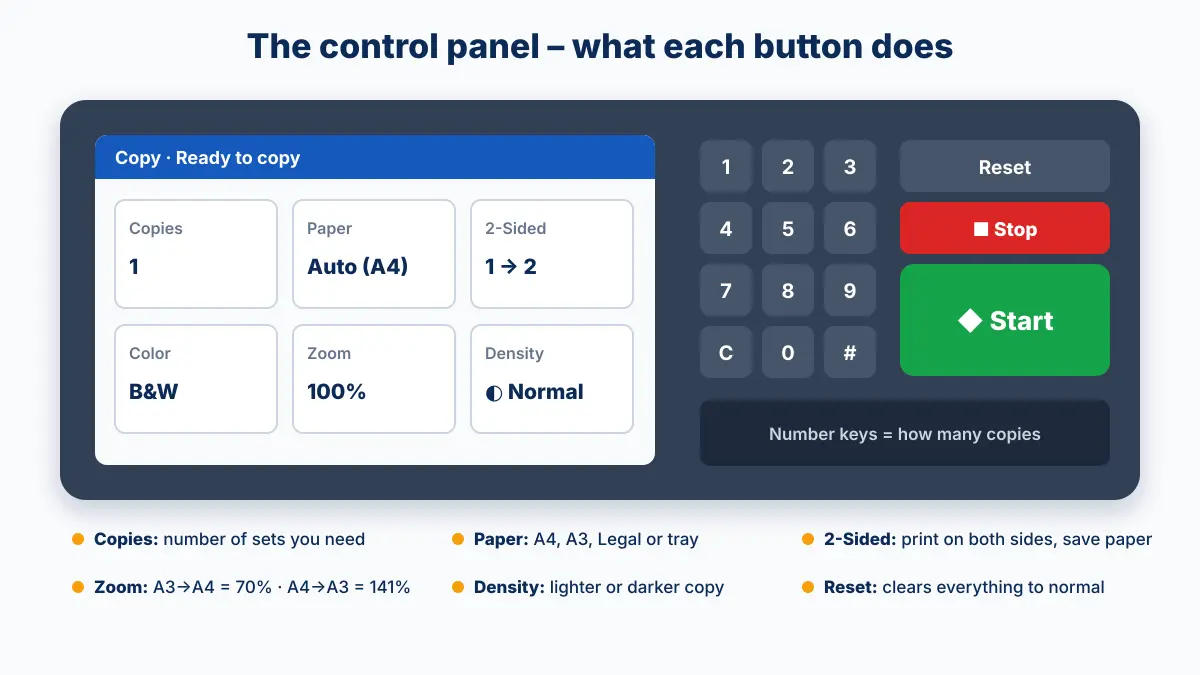
On the control panel, open Copy and set what you need. For a normal copy you can usually leave everything as it is. Type the number of copies with the number keys.
Step 4: Press Start
Press the green Start button. The machine scans the original and prints the copies into the output tray. If you made a mistake, press the red Stop button to cancel the job.
Step 5: Collect your copies and your original
Take your copies from the output tray and don't forget the original on the glass. It is very easy to leave it behind! Finally, press Reset so the next person starts with normal settings.
Useful copy settings explained
| Setting | What it does | When to use it |
|---|---|---|
| Copies | Number of sets to print | Always check before pressing Start |
| Paper / Paper select | Chooses the tray or paper size (A4, A3, Legal) | When your copy must be a different size from the original |
| 2-Sided (Duplex) | Copies on both sides of the paper (1→2 or 2→2) | To save paper and make thinner files |
| Zoom (Reduce / Enlarge) | Makes the copy smaller or bigger | A3 to A4 = 70%; A4 to A3 = 141% |
| Density (Darkness) | Makes the copy lighter or darker | For a faint original, or when the background looks grey |
| Colour / Black & White | Chooses colour or mono copy | Use black & white for normal documents. It costs less. |
| Sort (Collate) | Prints complete sets in page order (1-2-3, 1-2-3) | When copying a multi-page document for several people |
| ID Card Copy | Puts the front and back of a card on one page | NID, driving licence, student ID |
How to copy both sides of an ID card (NID) on one page
Many copiers have an ID Card Copy button or menu. Place the card on the glass and press Start. The machine then asks you to turn the card over, so turn it and press Start again. Both sides print on one sheet. If your machine doesn't have this option, copy the front, put the same sheet back in the bypass tray and copy the back on the lower half of the page.
How to copy a book
Open the book on the glass, face down, and press the spine gently with your hand. Don't push hard on the lid. Use Book Copy or Erase centre if your machine has it, to remove the dark shadow in the middle.
How to load paper
Most copying problems, especially paper jams, start with badly loaded paper. Loading it correctly takes only a few seconds.
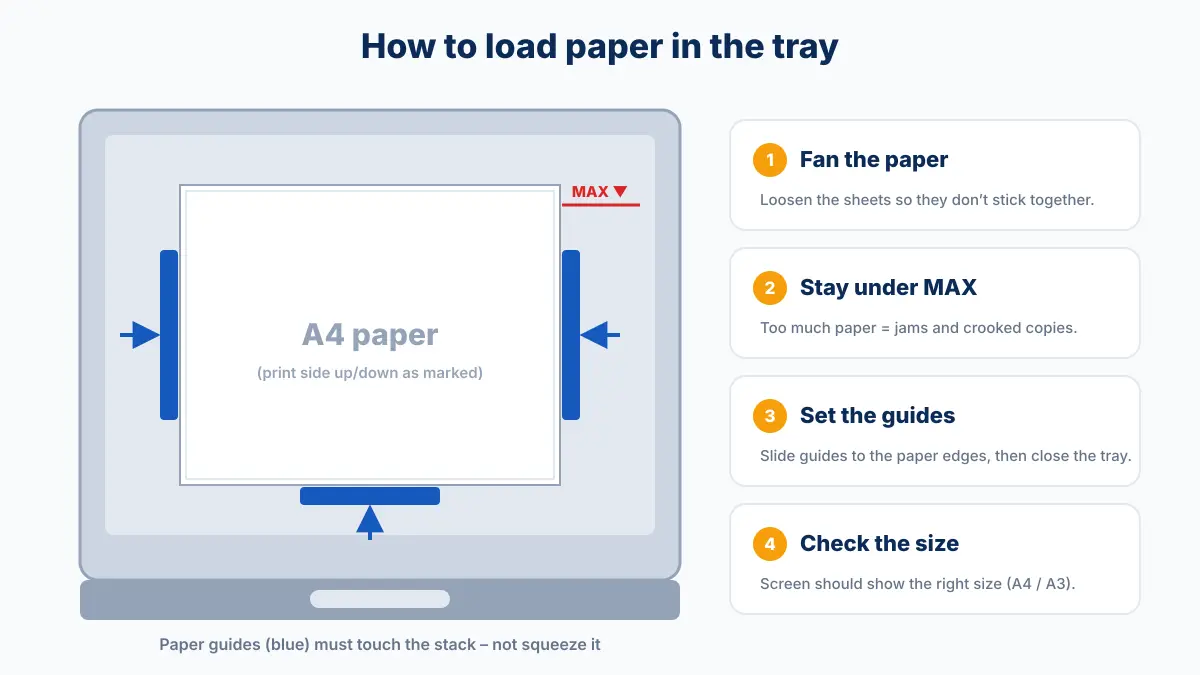
- Pull the paper tray out slowly until it stops.
- Fan the paper: hold the stack and flex it a few times so the sheets don't stick together.
- Place the paper flat in the tray and keep it below the MAX line.
- Slide the side and back guides so they touch the paper without bending it.
- Push the tray back in and check that the screen shows the correct size.
Use the bypass tray for thick card, envelopes, labels or special sizes. Put in only a few sheets at a time.
Common problems and quick fixes
Paper jam
A paper jam is the most common problem. The machine stops and the screen shows where the paper is stuck. Clear it calmly and never use force.
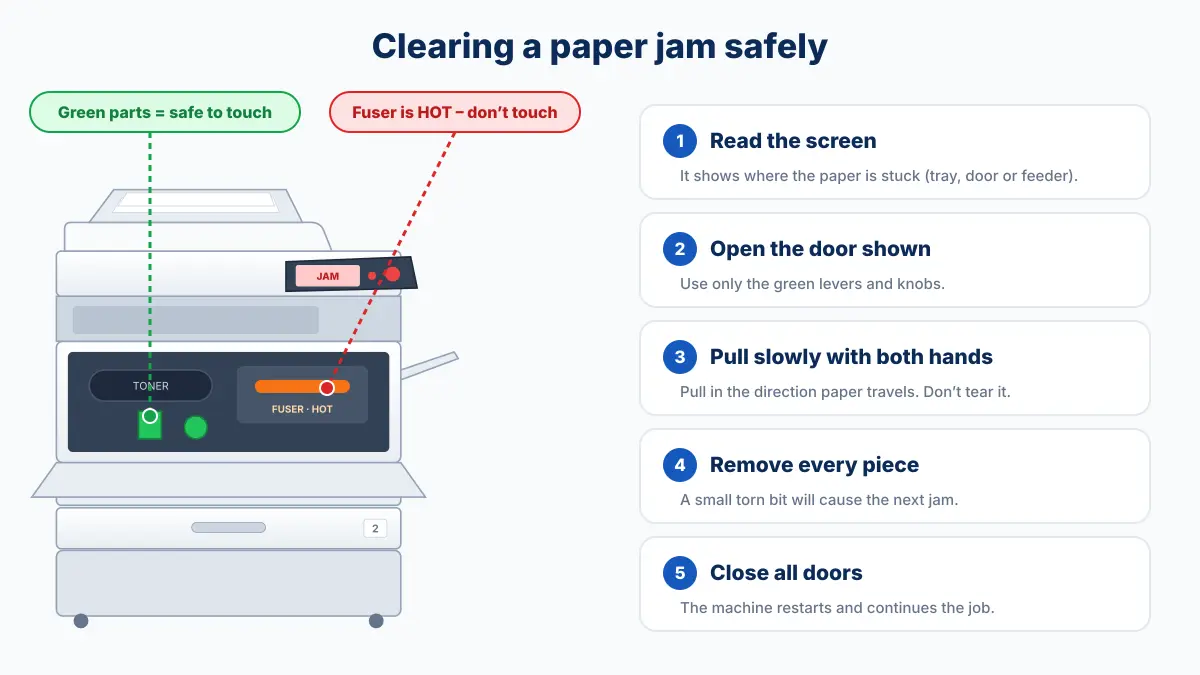
- Follow the picture on the screen. It shows which door or tray to open.
- Touch only the green levers and knobs. The fuser area inside can be very hot.
- Pull the paper out slowly with both hands, in the direction the paper travels.
- Make sure no small torn piece is left inside, then close all doors.
Other common problems
| Problem | Likely cause | What to try |
|---|---|---|
| Copies are too light or too dark | Density setting, or toner is low | Change the density; replace the toner if the screen asks |
| Black lines or spots on every copy | Dirt or correction fluid on the glass | Clean the glass and the thin strip next to it with a soft cloth |
| Lines only when using the feeder | Dirty scanning strip (slit glass) | Clean the narrow glass strip on the left of the main glass |
| Copy is crooked | Paper guides too loose, or original placed at an angle | Adjust the guides; line up the original with the corner arrow |
| Paper comes out wrinkled or jams often | Damp paper or a worn roller | Use fresh, dry paper; if it continues, the rollers need service |
| "Add paper" or "Toner low" message | Tray empty or toner running out | Load paper or replace the toner cartridge |
| Error code on the screen (e.g. "Call for service") | A part needs a technician | Switch off and on once. If the code comes back, call a technician. |
Tips to keep your copier running well
- Keep the glass clean. Wipe it with a soft, dry cloth. Never spray liquid directly on the glass.
- Use good paper. Normal 70–80 gsm office paper works best. Very thin, cheap or recycled paper causes more jams.
- Store paper in a dry place. In humid weather, keep paper in its wrapper until you need it. Damp paper curls and jams.
- Don't overload the trays or the document feeder.
- Never force a jam out or use sharp tools inside the machine.
- Use the correct toner for your model. Poor quality toner can damage the drum.
- Get regular servicing. A busy office copier needs cleaning and checking from time to time to avoid big repair bills.
Need help with your photocopier?
If your photocopier shows an error, jams often or gives poor quality copies, our technicians can help. Global IT Solution in Mirpur, Dhaka repairs and services photocopiers and printers of all major brands, at our workshop or at your office. Get a free quote or contact us to book a service.
Frequently Asked Questions
Should the paper face up or face down on a photocopier?
How do I reduce A3 to A4 on a photocopier?
Why are my photocopies coming out blank?
Can I turn off the photocopier at night?
When should I call a technician?
How do I photocopy both sides of an NID card on one page?

Printer, photocopier and IT service engineers in Mirpur, Dhaka. We write these guides from our everyday repair work.
Comments (2)
hi
1
Hi
1